Set Up The Controller
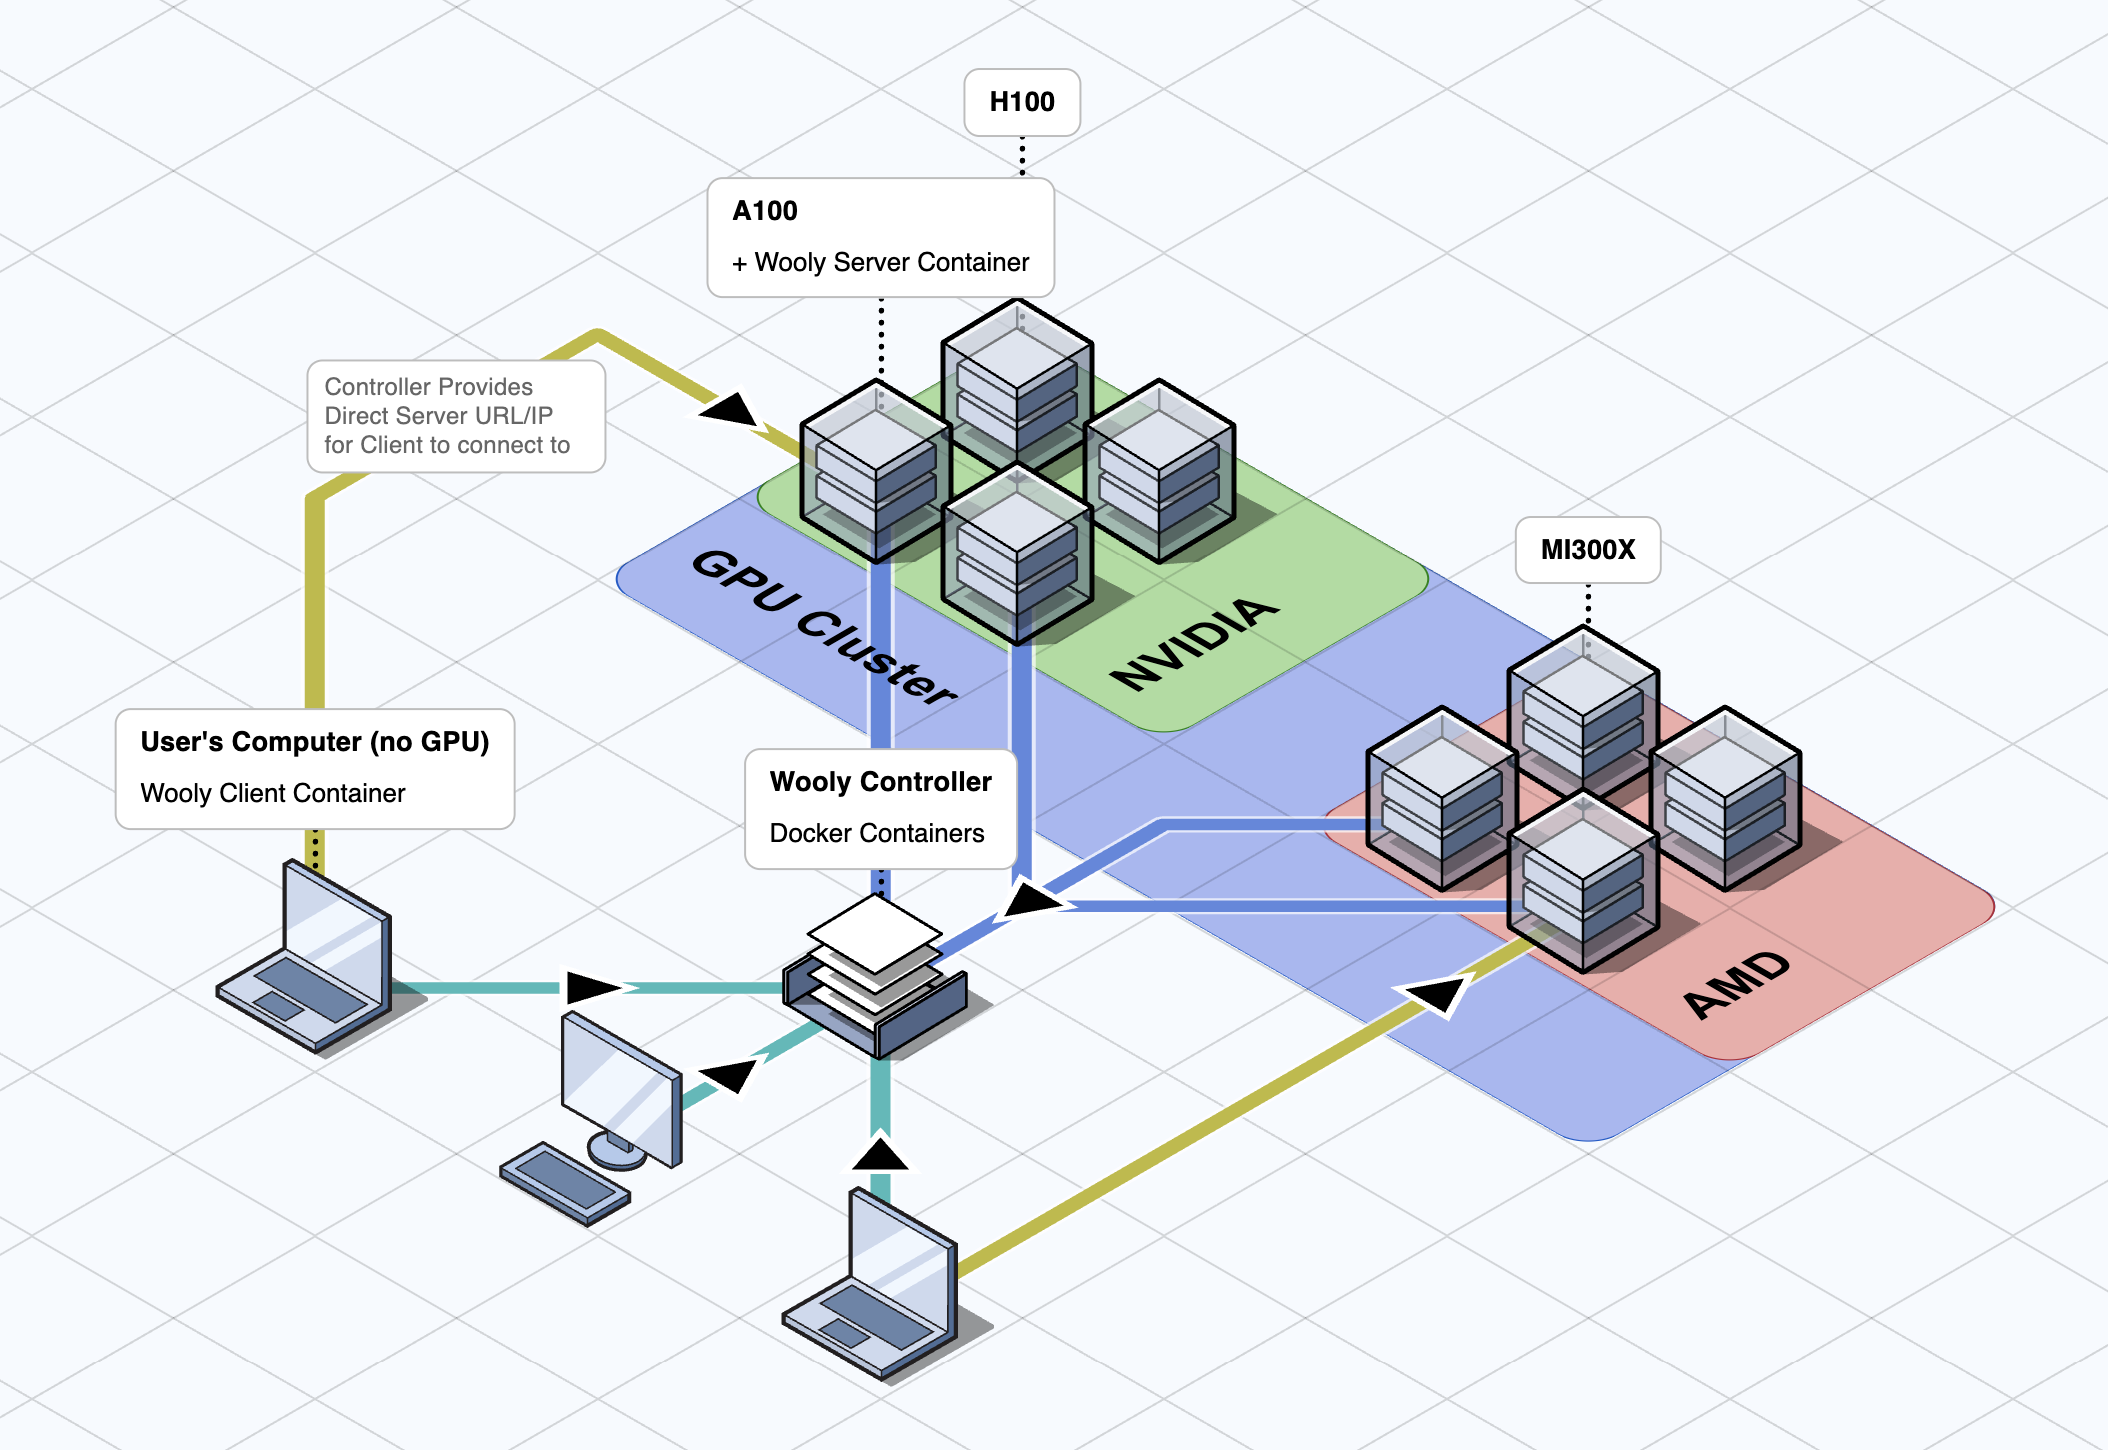
The WoolyAI Controller is like a router for routing GPU jobs across your GPU node cluster with REST APIS and a web interface. It is packaged to run as a docker container on your infrastructure and doesn't need to run on GPU. It is responsible for routing GPU execution requests from your ML CUDA containers running with WoolyAi client libraries installed to the GPU nodes running WoolyAI Server. It has three components:
- The WoolyAI Controller (API and Web UI)
- The WoolyAI Controller NATS Server (Message Broker)
- The WoolyAI Controller Database (ETCD)
Prerequisites
- Docker or Kubernetes (with Nginx Ingress Controller) to deploy the WoolyAI Controller in
- WoolyAI Server.
- WoolyAi Client libraries installed inside your ML CUDA containers.
Setup
Regardless of the method of setup you choose, you'll need to edit both the Client and Server config files to point to the Controller. You'll find instructions inside of the configs for each.
Take note of the nats ports as they will be used when pointing the Server to the Controller.
Docker
For Docker, we provide a docker-compose.yml file that you can use to run the controller. You can download it here. Inside of this yaml, you'll find each service making up the controller and how to configure them. The defaults we provide should work for most use cases.
Kubernetes
For Kubernetes, we provide a deployment.yml file that you can use to run the controller. You can download it here. Inside of this yaml, you'll find each service making up the controller and how to configure them. The defaults we provide should work for most use cases.
You'll need to have the Nginx Ingress Controller installed and running (https://github.com/kubernetes/ingress-nginx). You can remove the # Ingress for Controller section from the deployment.yaml file if you cannot install it.
Once deployed, you will find the 30422 NATS port you'll need to point your WoolyAI Server and Client to nats://{IP OR ADDRESS}:30422, as well as the web UI at http://{IP OR ADDRESS}:30080.
Overview
Once running, It will display a dashboard with information about the GPU nodes running the WoolyAI Servers, ML jobs/tasks, and GPU resource metrics like Utilization and Starvation(WoolyAI custom metric) percentages. Along with the Dashboard, you'll find Tasks, Nodes, and Groups.
Tasks
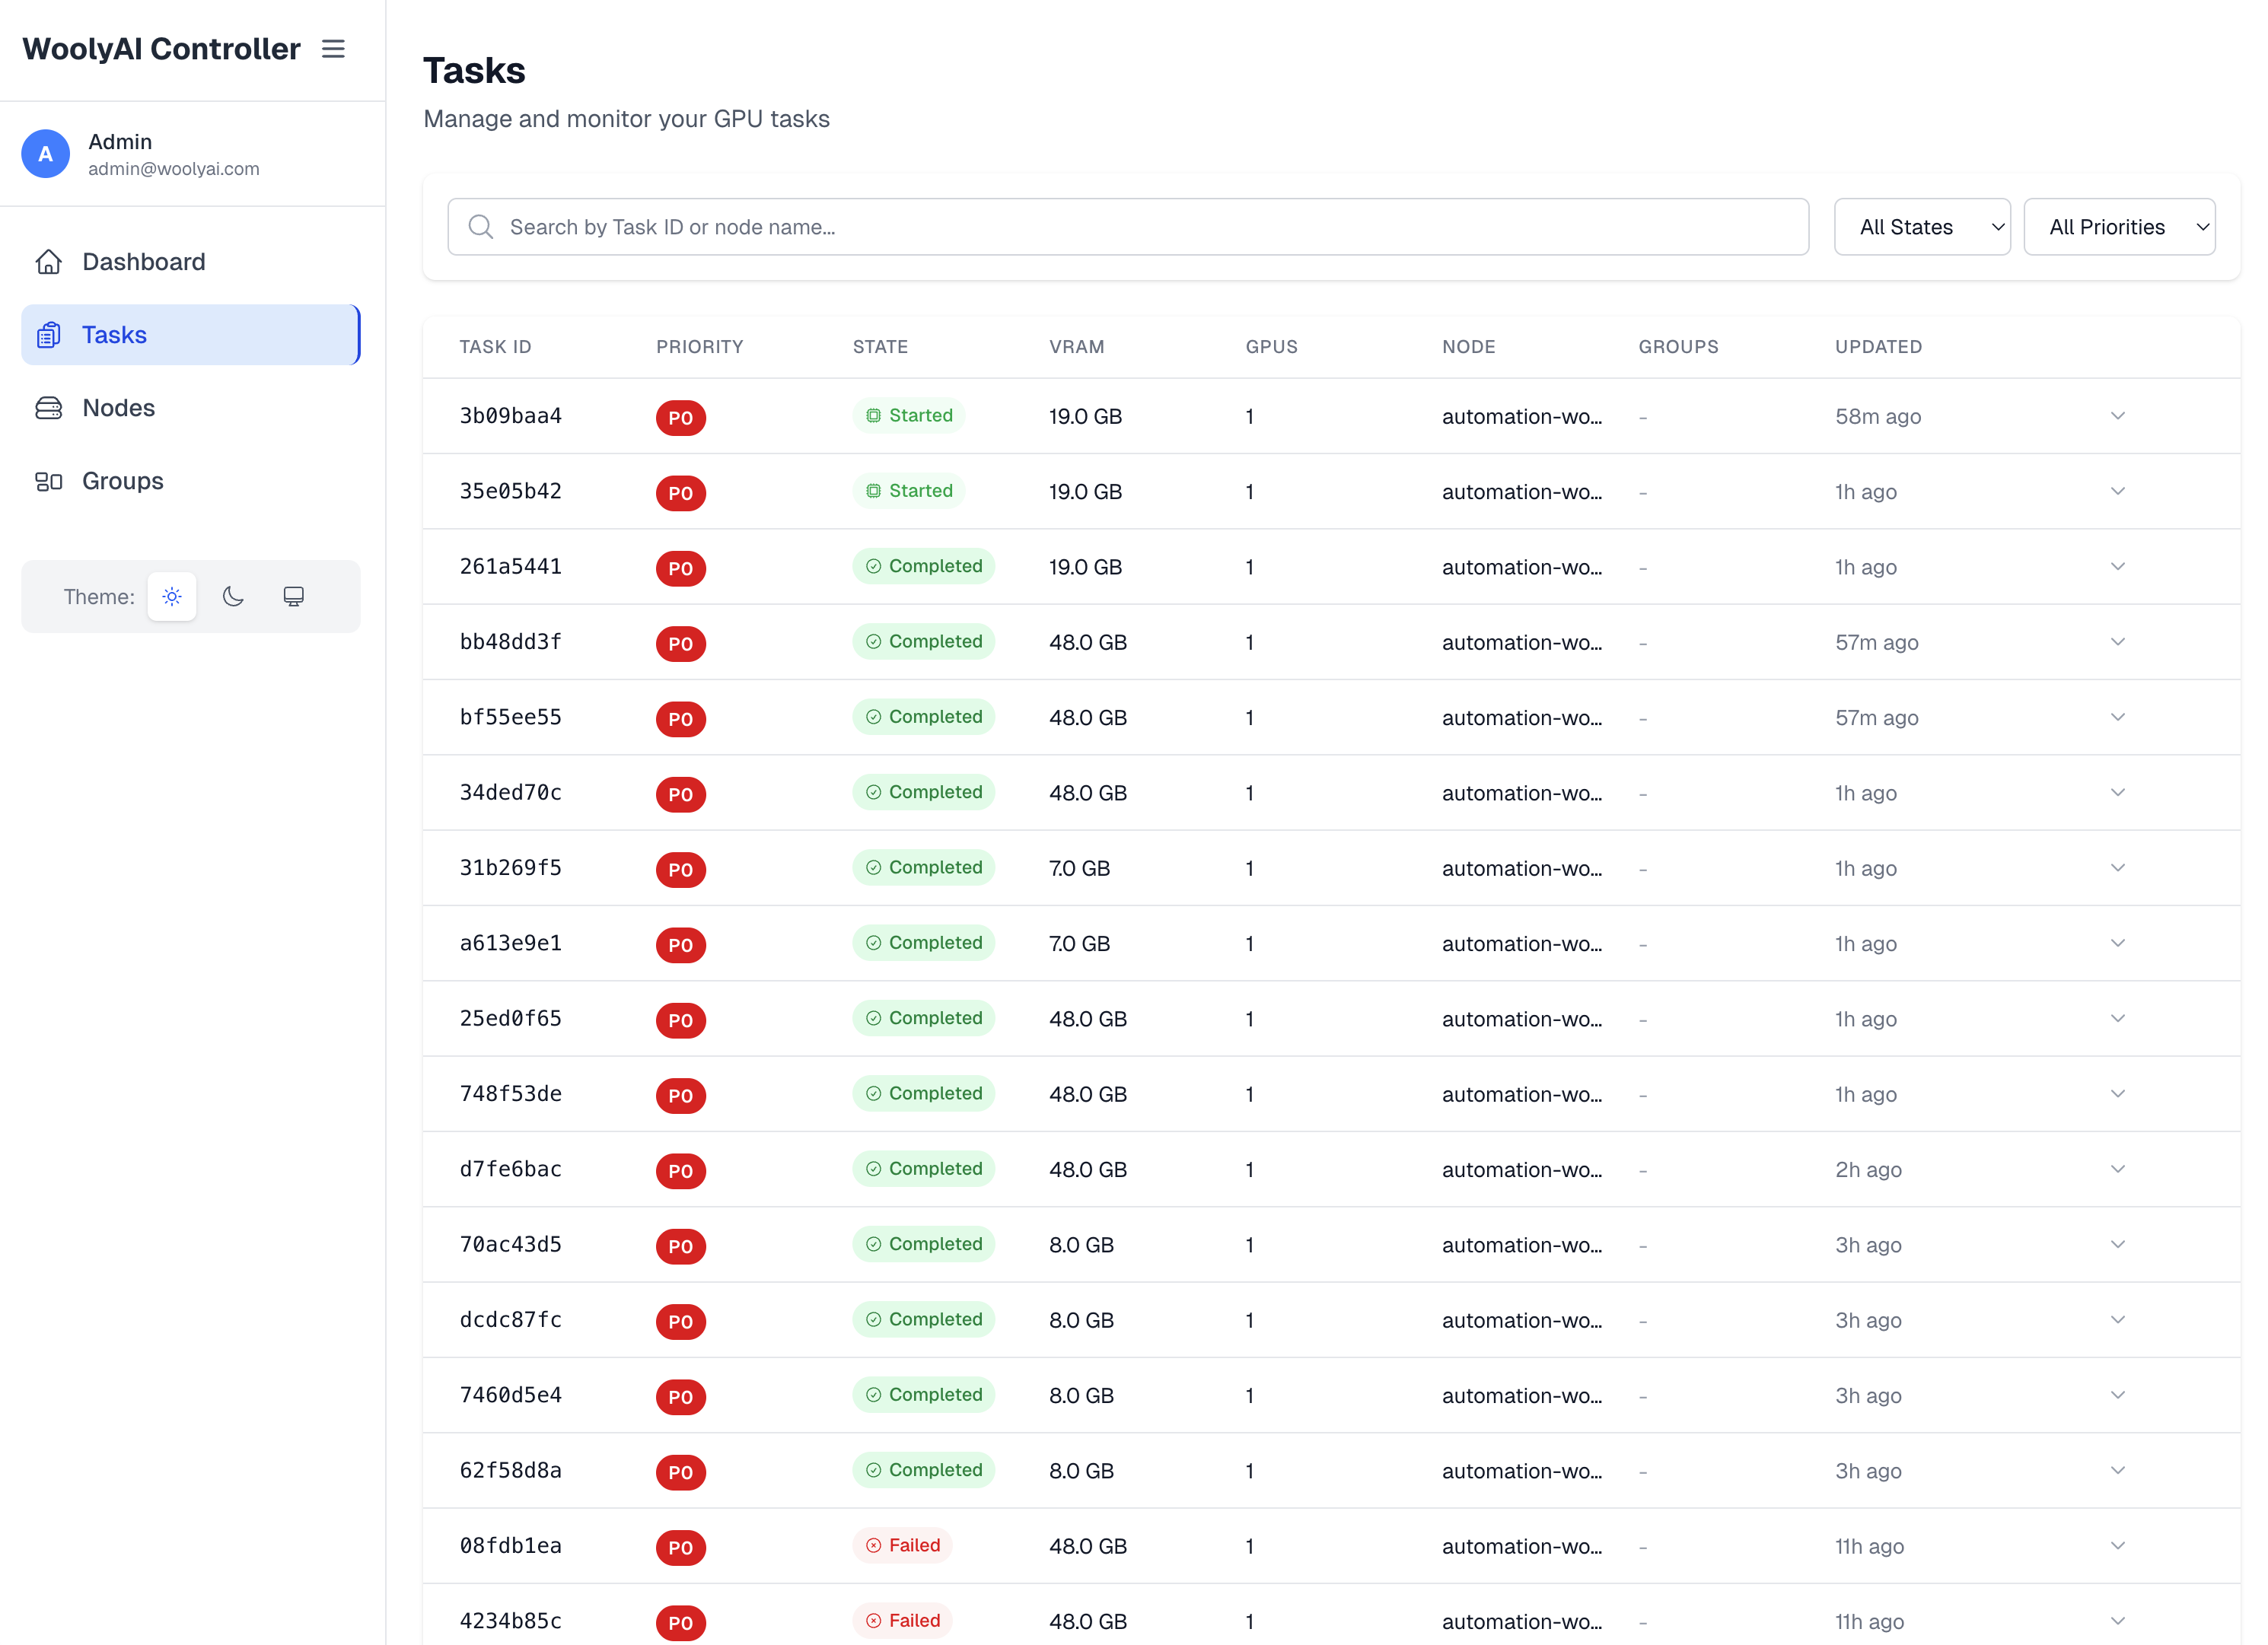
This is where you can see all the GPU execution requests from your ML CUDA containers running with WoolyAi Client libraries. Task list shows all running jobs on the GPU, pending/queued and completed jobs.
Nodes
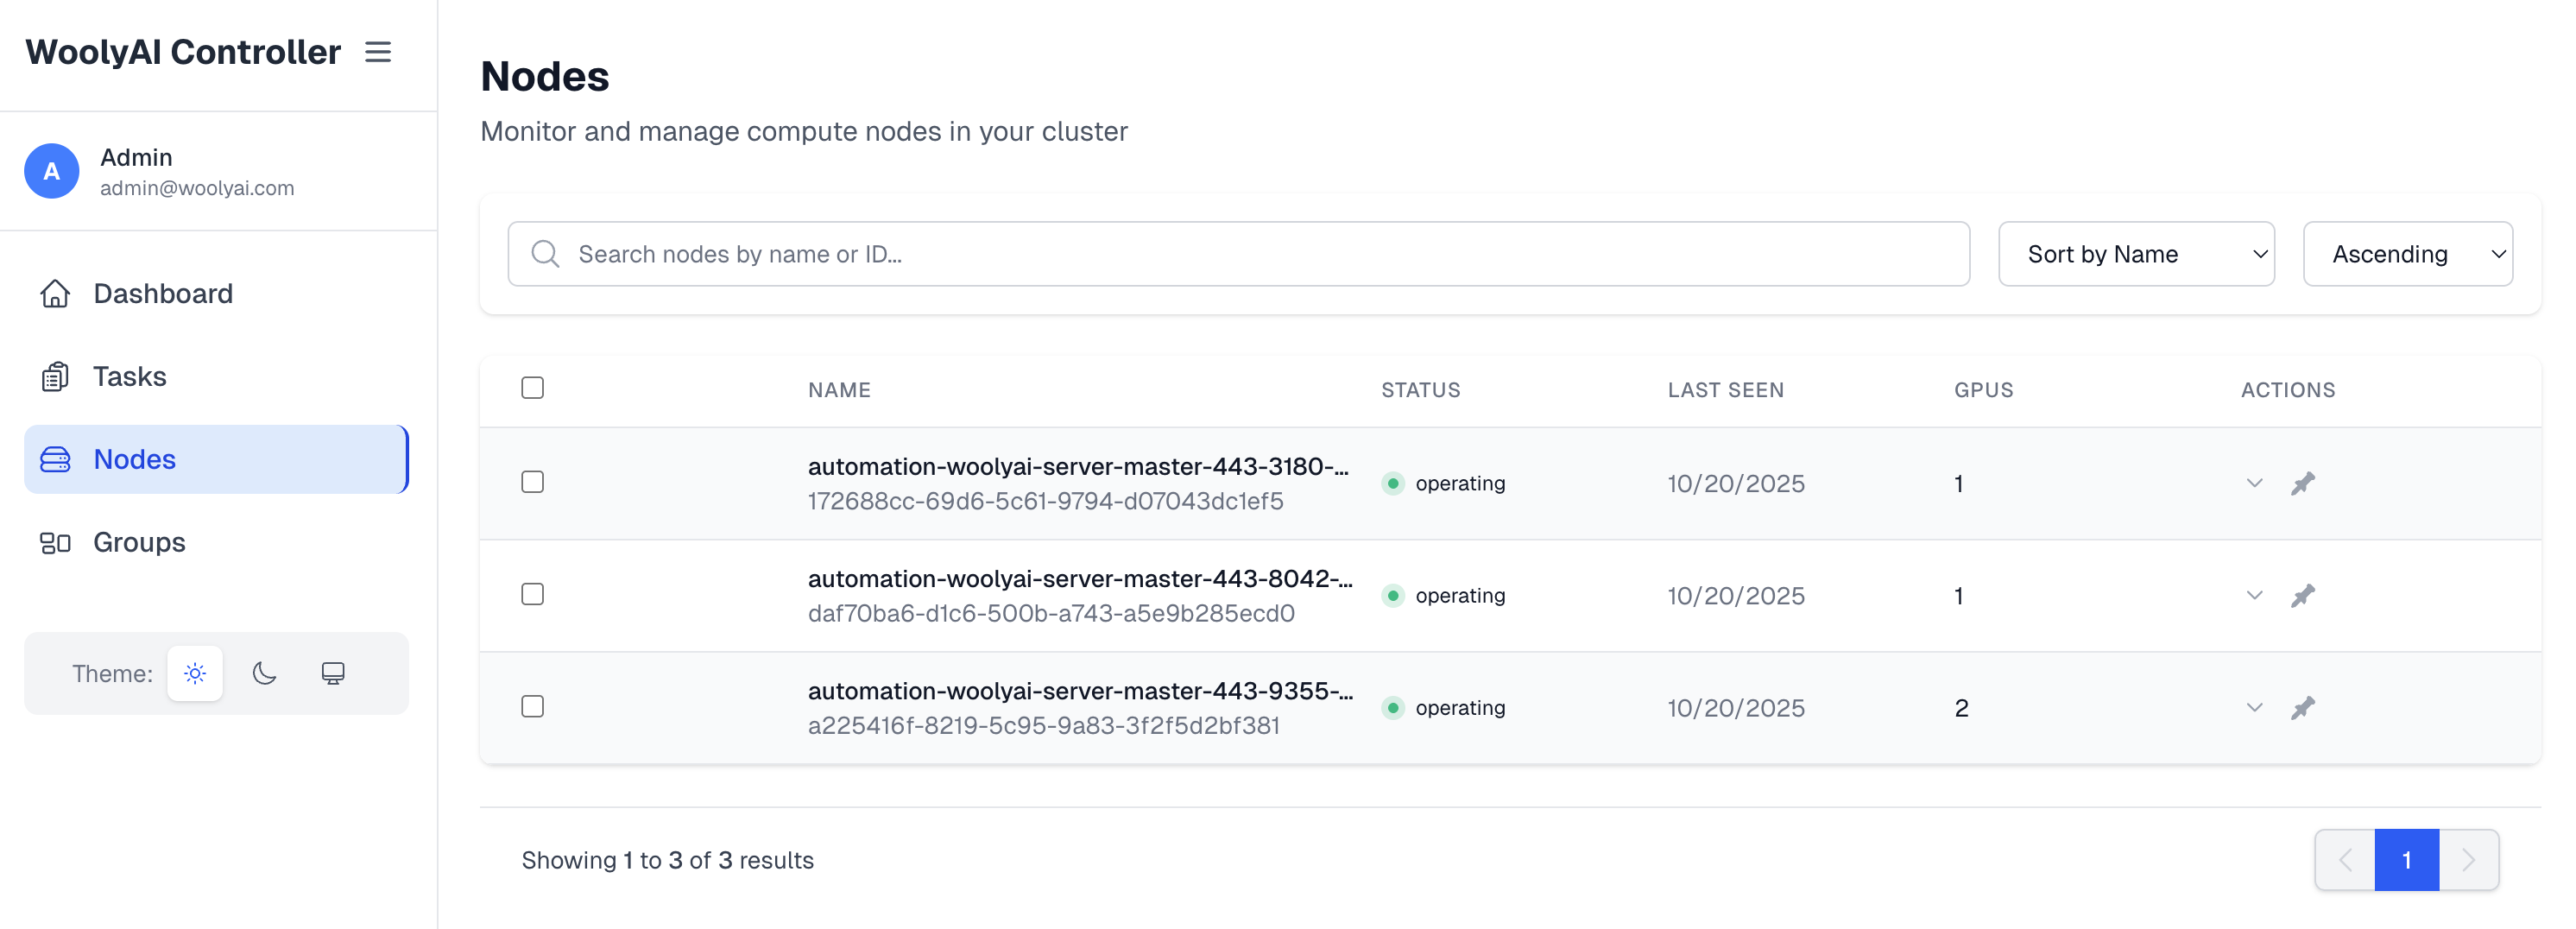
This is where you can see all the GPU hosts running WoolyAI Servers that are currently connected to the controller as well as information about them like how many GPUs they have available and how much they are currently being used.
Groups

This is where you can see all the groups that exist for the GPU Nodes runing WoolyAI Servers. You can put GPU nodes running the WoolyAI server in specific groups. Then, your can target specific ML workloads executing inside WoolyAi Client containers to run against a specific group(done through client config). This is relevant when you want a specific job on specific type of GPU. Note Including a node into a group mean only jobs targeted to this group will execute on this node and the node is taken out of the common pool capacity.
Connecting your WoolyAI Servers and Clients
Once the WoolyAI Controller is running, you can connect your WoolyAI Server and your ML CUDA containers(with WoolyAI Client libraries installed inside) to it. This is done by modifying both the Server and Client configs with the Controller URL restarting the containers.
Server Config
In the server config, you'll set the Controller integration values like CONTROLLER_NATS_URL, NODE_NAME, etc. They are clearly labeled in the config file.
Client Config
The client config is much easier. You'll simply set WOOLYAI_CONTROLLER_URL and any other required values in the same section.
Once restarted, check the docker logs command for both Server and Client and make sure they were able to communicate.
VRAM overcommit and swap
These settings apply only to the standalone WoolyAI Controller (this page). They are not the same as Kubernetes GPU Operator labels or pod annotations. See VRAM Overcommit for the operator path.
Startup default: environment variable
On the controller container (for example in docker-compose.yml or the downloaded deployment.yaml), you can set:
| Variable | Default | Valid range | Purpose |
|---|---|---|---|
CONTROLLER_DEFAULT_VRAM_OVERCOMMIT_PERCENT | 0 | 0–1000 | Global VRAM overcommit percentage when no value has been persisted to etcd yet |
Example (compose-style):
environment:
  # CONTROLLER_DEFAULT_VRAM_OVERCOMMIT_PERCENT: "0"  # default: 0 (no overcommit); valid: 0-1000
  CONTROLLER_DEFAULT_VRAM_OVERCOMMIT_PERCENT: "30"
How this interacts with the API: GET /api/v1/config uses the value from this environment variable only while the controller has no configuration stored in etcd yet (fresh install). After you successfully PUT /api/v1/config, the persisted setting in etcd is authoritative and the env var is no longer applied for the live default.
How the percentage works
The controller treats default_vram_overcommit_percent (and per-node overcommit_vram_percent) as extra VRAM headroom on top of physical memory for swappable tasks. Same idea as “20% ⇒ ~120% effective capacity” for scheduling. Non-swappable tasks (noswap: 1) are placed using physical free VRAM only.
Valid range for the global default is 0–1000 (percentage, per-node overrides use the same numeric range).
Global configuration (REST)
Read the current default:
GET /api/v1/config
Response includes default_vram_overcommit_percent (integer).
Set the cluster-wide default (example: 30% extra headroom):
PUT /api/v1/config
Content-Type: application/json

{"default_vram_overcommit_percent": 30}
Per-node override (REST)
Override overcommit for one registered GPU node ({node_id} is the node’s UUID from the API or UI):
PUT /api/v1/nodes/{node_id}/config
Content-Type: application/json

{"overcommit_vram_percent": 50}
Use 0 to disable overcommit on that node regardless of the global default. To clear a node override and inherit the global default again, use the API semantics your client supports for unsetting the field (see OpenAPI or controller docs if you need null).
Per-task swap mode (REST)
When creating or updating a task, you can set:
noswap:0— task may use overcommit headroom when the controller schedules it (default swappable behavior).noswap:1— task must fit in physical free VRAM only; controller will not count overcommit toward that task.
Client-side swap behavior for workloads that talk to the server without going through the controller task API is still controlled via WOOLYAI_SWAP_FROM_VRAM in the client configuration.
If you use the Controller web UI, check Nodes and Settings (or equivalent) for the same values exposed as forms; the REST API above is the stable contract.
FAQ
- There is no need to go into the container.
- If you only have a single GPU host with one GPU, you don't need to install the Controller. Controller is used to route client requests load across multi-GPU setup.
- If you have issue starting, try
docker compose down -vto delete the volumes and reset the containers from scratch.